Tuesday, November 20, 2012

Valentine's Day Cards in November!


http://forum.paperwishes.com/attachment.php?attachmentid=4300&d=1352642249

Seems a little odd to be making Valentine's cards in November, but Operation Write Home has to stay ahead of the calendar and these cards are due by Dec. 31.  As I was choosing papers, I realized I have a lot of paper packs with bits out of them, but never seem to actually finish one.  So for these cards I decided to use up HOTP Classic Creative Pack which features black, gray, red and tan patterned papers.  I added my own CS from WinArt, HOTP glimmer paper and various stamp sets.  I figure I had about 75% of the paper left and I have made 26 cards - most of them lovey dovey for OWH.  I thought I'd share a few.  the HOTP Paper Wishes Message board November week 2 challenge was a sketch that I used to make 7 different cards.

I didn't follow the sketch exactly as my 2 paper strips are not the same width and I did some rectangles instead of ovals.


I turned the sketch this way and that to keep it interesting.  My favorite is the middle one - I'm just not sure why.  I think it is because of the color combo.


I made one card from Operation Write Home's Weekly sketch challenge #147
http://operationwritehome.org/wp-content/uploads/2012/11/147.jpg

This is my card from the sketch - I'm not sure about this card - I want to try another one.


One last card to share.  I really love the Spellbinder's French Frills dies and JustRite matching Ooh-La-La matching stamps.  I finally convinced myself I could get them and here are the first 2 cards I made from it:
Thanks for stopping by and, as always, I'd love it if you left some comments!

Thursday, November 8, 2012

Really Reasonable Ribbon

Just a quick post to let you know about Really Reasonable Ribbon - it is the only place on-line I buy ribbon and I get their Ribbon Club as well.  Each month, a small package of goodies is delivered to my house!

Right now they are having a giveaway - check it out on their blog


These are just a few of the cards I've made with their ribbon - great quality, great price!  Check them out!

Holiday Card Workshop Day 9

I actually made a card on the same day as the class!  Of course, tomorrow is the last day, so not much of an accomplishment, but I'll take it just the same.


One of the techniques was to use sentiment stamps to make a background.  There seems to be a lot of embossing folders out there with lots of words on them, but I must confess I don't much care for them as I'm not really sure what to do with them beyond sanding.  So, I was intrigued with this technique.  Since all my Christmas cards are done, I decided to use the technique for a Valentine's card instead (just a reminder, the deadline for OWH is the end of December!).  I have 2 specific Valentine's sentiments, but didn't use either one.  Instead I pulled all the love kind of words from several sets of stamps from HOTP.  One thing I learned earlier with regular stamps is if they are not from the same manufacturer it is almost impossible to combine them on one acrylic block - they are not uniform depth.  I used a Nellie's heart die set and did the sentiments in the heart shape.

Jennifer Maguire used her cheat sheet method (which is fabulous) and her Fiskar's stamp press (if you don't have one - run, do not walk, to the nearest store and get yourself one) and used ink pads for her various colors.  I decided to use Marvy Markers in pink, red and cherry instead - just worked easier for me and I was able to ink them all at once and "huff" which saved a couple of steps.

I could probably fill the heart a little more - I saved my cheat sheet so I can easily replicate this card.  All papers but white are HOTP; white cardstock from WinArt; both ribbons are May Arts through Really Reasonable Ribbon.  I included the second picture because I finally figured out how to use the Bow Easy and have it come out right!


Have a great day and thanks for stopping by!

Wednesday, November 7, 2012

Holiday Card Workshop Day 7

To say I'm way behind in this class is really stretching it.  I love everything I've seen, but keep on getting side tracked.  I had decided after I sent my Christmas OWH box off this would be a good time to rearrange my craft room and bring order to chaos.  Unfortunately, I'm not Borg, so efficiency of time is not my strong suit.

Back to HCW:  Day 7 was using reverse stamps.  I don't have any , but the class showed a tree scene and I do have a Dreamweaver stencil that is a tree scene, so I used that.  Kristina did a beautiful card with the same kinds of colors, but made hers darker.  I decided to not use black ink for the background but used a Judikins blue glitter EP - you can't see the sparkle in the picture, but it is there.  I used Adirondack lights to brush color onto the trees which were the white of the background CS.  I liked the lighter look so did not add any black ink.  I popped it onto a white card base run through a Sizzix snowflake EF added a little ribbon and bling and was done.

I'm hoping to get more cards for the class done as well.

Thanks for stopping by!

Thursday, November 1, 2012

Garden Journal

Seems like World Card Making Day turned into World Card Making Month on the Paper Wishes Message Board.  One of the many activities was a Garden Journal swap and cover contest.  All of the pages/covers can be seen here.

My pages were put to shame by the others, but I'm going to share them anyway, LOL!  I kept mine very simple; the first one I used a Crafter's Workshop Template and homemade sprays using Adirondack re-inkers.  I added some embellishments from the Finished in a Flash Floral kit, a bit of Liquid Pearls and called it good.

For the second page, I used the Doodles template to add some flourishes.  I cut a border with the Tonic Dotty Border punch, layered some papers and Liquid Pearls again.


This is my cover.  I used Vintage Roses, Sunshine & Shadows papers, Design Tool 1, Swirls/Flourishes Dazzles, Chocolate Jute Cord, Word Fragments, Tonic Dotty Border punch, Bohemian Embellish-abilities, silver fibers and the Fringed Mums Quilling Die.


This is a close-up of the focal.  I cut various labels from the Design Tool onto white CS and PP.  I added "imagine" and "dream" silver word fragments.  I wasn't sure aobut the quilling die when I got it, but I really like the flowers it makes.  I used 2 strips of the medium and large cut PP - I didn't plan on the color gradient, but it sure is a pretty, happy accident.  I added 2 brown felt flowers (not sure where they are from) along with 2 red flower brads and the black Dazzles.


These are not the usual colors I like to work with,but I really like how the whole thing came out.
There were just a few people in the swap, but I plan to add blank pages and use this journal as an art journal as I delve into "mixed media".

Thanks for stopping by!

Wednesday, October 24, 2012

May Arts Ink It Challenge

I was thrilled to be picked to participate in the May Arts Ink It Challenge!  I didn't win and that is ok - the other entries were absolutely gorgeous and put my effort to shame.  Anyway, the challenge was to use the provided ribbon in a project and to color the ribbons.  Helmar Arts provided the adhesive for the challenge.  I chose to make a Thanksgiving table centerpiece with my ribbon.


 This is a close-up.  I built the centerpiece on a gold charger plate I got forever ago for about a buck.  I alcohol inked a pillar candle for the center of the piece.  I repurposed this candle - it started off years ago as a plain white candle that I had alcohol inked in greens and blues.  The candle was still in good shape, but the set looked the worse for wear.  So, I cleaned the old ink off it with rubbing alcohol and re-colored it.  You can't tell it hough.  I used a variety of leaves that I stamped, embossed and cut and also glittered leaves from WalMart and leaves, acorns, etc. from K& Company.  I used tea dye distress ink on the mini pom-pom ribbon wrapped around the candle and held in place with a pin.  The mesh ribbon I painted with gold paint.  It was 1 1/2 " so I cut a piece, cut it in half and tied the bow adhering it with a pin as well.  The suede leaves I colored with a variety of Distress re-inkers;  I wasn't happy with them as the colors did not stay bright.  The last ribbon I was given was a canvas ribbon which I colored green and orange with Copic markers.  I used a black Copic to add faux stitching to the edges.  Little bows are scattered throughout, but you can see the ribbon better on the basket below.  I decided to use my leftovers to make my other table settings as well.


 The cute bushel basket is from a HOTP template.  It was quick and easy to put together with brads.


The place cards are a triangle shaped box which I will fill with candy.  I used a Spellbinder die, bits of leftover ribbon and leaves to decorate.  The alphabet stickers are Mrs. Grossman's.


The napkin ring was made from cardstock with PP strips as a border, a couple of leaves and a K&Company die cut.  I cut a piece of mesh ribbon and tucked it behind.  Simple and festive.
This is a picture of the completed set.  In person the glitter and EP make everything shine.  Everything matches the tablecloth I always use for Turkey Day dinner! LOL.

I only have 15 more place cards and napkin rings to go.  Most papers are DCWV or HOTP.  Leaf stamps are Heartfelt Creations and leaf die is Spellbinders.


As I said, I didn't win the contest, but I am very pleased with how it all came out and I think it will make a beautiful setting for my family.

Thanks for stopping by!  Please leave some comments - I love to read them...

Wednesday, October 17, 2012

Operation Write Home Sketch Challenge

I have 2 different cards for OWH sketch #142.  I've been busy making a lot of Christmas cards so I can get my box mailed out and I liked this sketch and wanted to get it in. 

This card uses HOTP Winter Delights paper pack - I really like the soft colors with the pop of red.  I have 3 ribbons across the top: white grosgrain is topped with a plastic mesh, sparkly ribbon (nothing rubs off) and then teal baker's twine.  I bought all the ribbons from Really Reasonable Ribbon.  I also used Zing embossing powder and Candi.  Stamp is HOTP.

The second card has a very different look to it.  These papers are from Christmas Splendor paper pack also from HOTP.  I picked these papers to enter the Paper Wishes Message Board October Color Challenge of red and brown.  I matted all the papers with ivory cardstock from Winart and ivory ribbon from RRR.  I added Zva Creative champagne bling to this card and backed the sentiment with gold mirror paper.
If you've never checked out Really Reasonable Ribbon, I recommend you do so.  They have a great selection and their customer service is terrific.  I've made several orders and each time the estimated shipping has been high and the difference was refunded to me - pretty unusual since most places have flat rate shipping that often seems a tad high.

Thanks for stopping by; as always I'd love to read whatever you want to write!

Saturday, October 13, 2012

Fun with Templates!

I recently received my October Paper Wishes Template Personal Shopper.  This month the template was the Christmas Gift Card Holder, because I subscribe to the Personal Shopper program, I get the template, papers and a newsletter with sample projects and instructions. 


 There was also a recent webisode which demo'ed the template and had more samples.  Because most of the cards I make are for Operation Write Home, I had to downsize the cards so they would be A2 size.  I made the mitten, snowman and tree as the gift card holders, but I also wanted to expand their use.  This is a card I made using the mitten:


I also played with the mitten template and was able to make a mitten shaped card:
The Stickles really sparkled in person.  For both cards, I cased the HOTP design - I would never have put blue snowflake paper with green plaid, but they look great together.


There was quite a bit of paper left over when I was done, so I decided to play with another template I just got the Christmas Iris Folding Template.  I made the snowflake using 3 different snowflake papers by HOTP and a scrap piece of white glitter paper for the iris.  This ended up being a 6x6 card; I framed the snowflake with paper cut from Spellbinder's dies added white, then blue ribbon on the bottom.  The sentiment is a sticker.  As a final touch, I sprayed the whole thing with Crafter's Companion Spray and Sparkle Silver; it added a wonderful touch to the finished card!
 As always, thanks for stopping by!


Tuesday, October 9, 2012

More from World Cardmaking Day!

One of the activities for the day was to pick ahead of time from a list of gardening terms what you were going to make for an "anything but a card" challenge.  I was the one who came up with all of this, but when I signed up I couldn't remember what was what so I picked sphagnum moss (project), violets (embellishments) and a licorice plant (techniques); this translated into making a fat page with glitter and misting.  Here is what I came up with:

and a close-up of the fat-page itself:
I started with a white piece of cardstock which I sprayed with home made mists in pink and blue.  I then sprayed a paper doily with purple Glimmer Mist.  I cut and embossed a Spellbinder's scalloped circle and with the die still on sponged Ranger Cool Peri on it leaving a white border.  To a pink PP circle I added a dazzle topped with another circle to which I added a phrase dazzle and 2 double stick heart dazzles which I used teal glitter on.  I stamped, heat embossed and cut out 4 button stamps which I topped with gold jewel Dazzles.  I decided to make it into a wall hanging and added more double stick dazzles to the ribbon topped it with 2 large flowers I have had forever and another button stamp.  I am really happy with how it turned out.

The next challenge I did was to preselect 3 card projects - winter, patriotic and overgrown which turned into:
Winter - a purple and white Christmas card using glitter and a die cut.

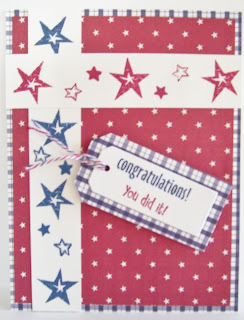
Patriotic - a congratulations card using my national colors
and Overgrown - a 5x6 1/2 inch card using at least 1 piece each of the following sizes 1x3, 2x6, 3 1/2 circle and 2x2. I matted most of the pieces and am pleased with this card.  I'll save this for one of my boys since it isn't A2 size for OWH.
Thanks for stopping by!


Monday, October 8, 2012

World Cardmaking Day Cards

We had a real fun, but busy day Saturday on the Paper Wishes Message Board.  I was able to participate in the first 3 challenges before I took over hosting duties.  The first challenge was to make a card using the color brown.  Pretty easy and here is my card:
All supplies are from Hot Off the Press (of course!)

The second challenge was to make a shaker card.  I must admit I had never made one before and I obviously still need some practice, but here it is:

The 3rd challenge I did was to make a card using different sizes of the same shape.  I chose scalloped circles and used them to make a border.  I used the same papers as for the shaker card - Winter Delights.

I hosted the rest of the day so did not participate in the challenges, but did find the time to make the next 3 cards for the bingo contest on the message board.  The first card I needed to us blue papers, Dazzles, 3 brads and paper tearing.  I'm not a big fan of tearing, but this came out alright.  I inked the edges of the torn papers.


 This next card needed to have blue and purple, vellum and the use of a template.  I used the 20 blossoms template for the flower.  I also used my new Spellbinder's Die to thread the ribbon - it is a beautiful die!


This last card needed to have yellow, vellum, a punch and paper piercing.  I used the Tonic dotty border punch and the flower is also made from a punch.  The yellow is vellum as is the inner matting for the flower.  I paper pierced each scallop on the patterned paper and the vellum backing the sentiment.  It is hard to see, but I also pierced the purple vellum using the HOTP paper piercing template.

I'll be back with the rest of my projects from World Cardmaking Day.  I also want to shout out a huge thank you to Hot Off the Press for sponsoring the festivities with prizes totaling $500.00.  If you love using their products, join us on the message board - we have a lot of fun and learn new techniques all the time.

Thanks for stopping by and please leave me some comments, I love to read them.

Friday, October 5, 2012

Paper Wishes 2012 World Cardmaking Day Blog Hop!

Welcome to the Paper Wishes BLOG HOP - we are so glad you are here to help us celebrate World Card Making Day! Some card making day trivia for you:
Today, card making is a worldwide hobby, especially popular in Australia, Canada, the United Kingdom, and the United States.
1 in 6 U.S. households participates in making cards
86% of scrapbookers also create handmade cards
92% of paper crafters create cards more than any other type of project

Be sure to check out all the blogs in this blog hop, as well as visit the Paper Wishes message board as there are lots of things going on there today, all sponsored by Paper Wishes, with some great prize packages! You don’t want to miss a chance to win! 

To win a prize package of Paper Wishes products: leave a comment on ALL THE BLOGS by noon, Eastern time on Sunday, October 7 and a random drawing will be done to choose the winner.

So on with the fun – it doesn’t matter where you start the blog hop, just see where you are on the list and make sure you visit them all and leave some sweetness behind!

Participants:
Penny -----you are here!
Nancy
Michelle
Patti Prince
Robin
Jackie
Cheryl
Sam


This year's theme for the blog hop is gardening.  I chose to make a card with 2 flowers that I built up with lots of layers.  The papers are from Coordinating Florals and Patterns (an old paper pack) and Plain Pastels (another old book of paper).  Flowers came from the 20 Blossoms Template and I sprayed them with Goosebumps spray.  I've only used Goosebumps before on white cardstock that I then inked for a resist look (like I did here for last year's WCD card, but I like the look of dew on the flowers - unfortunately, I don't have a camera that takes good enough pictures to show.  I put a  Kaisercraft Pearl in the center of each one.  I cut the 2 largest and smallest of Spellbinder's Decorative Labels One to layer on the pink vellum.  A gold greetings Dazzle and a few more pearls topped it off.  I used ribbon that I bought from Really Reasonable Ribbon across the bottom of the card and I was done.  If you haven't checked out the ribbon website - do yourself a favor and do so after the blog hop, they have a wonderful selection, great customer service and quick delivery.


 Thanks for stopping by and don't forget to leave a comment on all the blogs for a chance to win!  Paper Wishes provides the message board members with tremendous support and they are sponsoring all of our WCD prizes.

As always, I would love to read your comments and I hope to be back blogging on a regular basis again.

Thursday, October 4, 2012

I'm Back!!!

It has been quite a while, I'm sorry to say since my last post.  Just shy of a year.  It has been a tough year for me, but I'm finally feeling I can see a light at the end of the tunnel (and I know it is not a train - LOL).  I'm still coming to terms with not working and with my physical limitations, but I need to look forward.

So, Saturday is World Cardmaking Day and I will be participating in a blog hop for the Paper Wishes Message Board.  The hop actually begins Friday a.m.; so please, come back then to see my card. 

I'm hoping to catch up with everyone else's blog as well.

Take care!