The second set of cards for the horse rescue program used Penny Black stickers of boats. They make great masculine cards.
The plaid paper is HOTP. The burgundy frame is what is left over after cutting an oval. I liked the scallop and cut outs so decided to use it to frame the sticker and grey cardstock. The corner pieces are actually Design Lines stickers and are small squares. I cut them in two as a way to help people see supplies can have different uses.
I used the actual die cut on the inside of the card and cut my sticker in an oval shape to match. The die I used is again from Nellie's.
The 2nd card is a gatefold. I covered it with kraft paper and the blue DP is Little Yellow Bicycle. The kraft paper is the solid dark blue on the reverse side so I alternated them when cutting the Nellie's medallion. I covered a piece of chipboard with the DP and added the sticker. The brad like things you see are called Candi. They are made of paper and have their own tiny pop dots that fit perfectly. They come in a lot of colors and are fun to use. You can't see, but they are also on the bottom of the card.
For the inside I again used both sides of the kraft paper as mats.
That's it for today. Have a wonderful day and create something wonderful!
Most of the cards have no sentiment, but here I used one from Outline Stamps. If you can have a favorite sympathy sentiment, than this one is mine. I used the same yellow plaid DP from HOTP. The saying is embossed on dark gray cardstock with Zing gold embossing powder and matted on a red plaid strip which came from the same paper as the yellow. This paper is actually one of their school line, but I cut it up to use the pieces I wanted.
The sailboat is matted on the same gray cardstock which is edged with a gold leafing pen. I also again cut a sticker in half for the 2 corner treatments.
This final card of the set starts with dark green cardstock and DP from Kaisercraft. The paper as a whole has a cute owl in the bottom left corner, but I was able to cut pieces for these cards from the top. The sticker is matted on peach cardstock and I used Design Adhesives by Clear Snap and then used a brown Foil Glitter Flock sheet from We Are Memory Keepers. I'm sorry to say that company has stopped carrying this line! They make added glitter, flock and foil easy with no mess. Simply lay them over the adhesive and rub. I have a small stash, and when it is gone I'll be back to glitter and flock everywhere (including the dog) LOL. The border pieces are from K & Company. Because they were designed for scrapbooking, I was able to get three pieces from each border.
The inside of the card was matted and embellished the same way with the addition of 2 Candi on either side of the sentiment.
Welcome! My blog is centered on papercrafting but from time to time my family will make appearances (usually on layout pages) and I'm working hard to see how I can incorporate my love for all things Star Trek!
Tuesday, July 12, 2011
Monday, July 11, 2011
What an amazing day!
Saturday was a terrific day at my local LSS, Inspired Designs. Cheryl hosted a fund raiser for a horse rescue group here in Maine and one of the horses spent the day in her backyard. I had been asked to design 16 cards; 4 each from a different package of stickers. I don't use a lot of stickers, but these by Penny Black are amazing and were very easy to build a card around. I'm hoping to post all the cards this week before I send them off to Operation Write Home. The first set I used was:
I love this set; the colors are rich and vibrant.
The first card uses the stickers as well as Color Story rub-ons with bling. The paper is Sassafras. I started with a 5x7 card and cut an inch off the front to allow the border to show.
I again used a sticker and rub-on for the inside of the card. We set aside one hour "classes" for folks to assemble their 4 cards. Doesn't sound like a lot, but all the cutting, measuring and scoring was done for them.
This card came together quickly. I popped the image and was able to find a red (HOTP - see the bottom card) to go with the polka dots paper from My Minds Eye to add the two strips. A ribbon knot and it was done.
This is one of my favorite cards of the 16. Again, quick and easy using a Nellie's Die medallion and my current favorite die set - the butterflies from Joy Crafts. They cut and emboss beautifully, look awesome layered together or pop dotted with their wings bent for dimension.
The paper is Making Memories. Most of the 2 sided DP I used was the "B" side. Kind of like our old 45 records...(yes, I am old, you can say it LOL).
This is the fourth card of the set and my least favorite of the 16, I'm just not sure why. The paper is Red Sponged with Argyle Border from HOTP, I have lots of the border part left - I'll have to use them for Christmas cards. The window die is from Heartfelt Creations it is an exclusive to them Spellbinder's Die. I cut out the middle panes and for the mat, I embossed the die and then cut along the outside edge. I've been finding lots of ways to use this die - I even cut them up and am left with four corner pieces, which you will see in another card.
I'll be back tomorrow with another pack.
GUEST HOST CHALLENGE: I am the guest host for a Paper Wishes message board challenge for the next 2 weeks. Check it out here!
I love this set; the colors are rich and vibrant.
The first card uses the stickers as well as Color Story rub-ons with bling. The paper is Sassafras. I started with a 5x7 card and cut an inch off the front to allow the border to show.
I again used a sticker and rub-on for the inside of the card. We set aside one hour "classes" for folks to assemble their 4 cards. Doesn't sound like a lot, but all the cutting, measuring and scoring was done for them.
This card came together quickly. I popped the image and was able to find a red (HOTP - see the bottom card) to go with the polka dots paper from My Minds Eye to add the two strips. A ribbon knot and it was done.
This is one of my favorite cards of the 16. Again, quick and easy using a Nellie's Die medallion and my current favorite die set - the butterflies from Joy Crafts. They cut and emboss beautifully, look awesome layered together or pop dotted with their wings bent for dimension.
The paper is Making Memories. Most of the 2 sided DP I used was the "B" side. Kind of like our old 45 records...(yes, I am old, you can say it LOL).
This is the fourth card of the set and my least favorite of the 16, I'm just not sure why. The paper is Red Sponged with Argyle Border from HOTP, I have lots of the border part left - I'll have to use them for Christmas cards. The window die is from Heartfelt Creations it is an exclusive to them Spellbinder's Die. I cut out the middle panes and for the mat, I embossed the die and then cut along the outside edge. I've been finding lots of ways to use this die - I even cut them up and am left with four corner pieces, which you will see in another card.
I'll be back tomorrow with another pack.
GUEST HOST CHALLENGE: I am the guest host for a Paper Wishes message board challenge for the next 2 weeks. Check it out here!
Friday, July 8, 2011
You're Invited!
Happy Friday everyone! I hope you enjoyed last week's blog hop as much as I enjoyed reading all your comments. Welcome to my new followers - I'm very happy to "meet" you!
This week's challenge at PaperCutz Challenge our mission is to create a project using a die cut, hand stamped or digital stampede image of an ice cream cone, popsicle, ice cream sundae or milk shake. This challenge definitely says summer, doesn't it? I know that Mary has the challenge written as "Cricut cut", but any die cut machine or die-cut is welcome. However, if you haven't checked out Mary's Cricut challenges, you should! Also, have you stopped by Cardz TV with Mary? I just love her accent!
On to my project which doesn't fit into any of the categories (LOL), I used 2 templates from HOTP - 3-D Ice Cream Sundae and Sweet Treats Pockets.
I made an invitation and a party favor for an ice cream party (I LOVE ice cream). Both were pretty easy to do with the templates. You'll notice the small ice cream cone in the large one's pocket and this is where I will put the details for the party.
The ice cream sundae looks complicated, but goes together in a snap. The ice cream itself opens and you can put a small treat or gift inside. I used HOTP foil paper for the cup and their shine design paper for the topper and "wafer". This template even has a spoon! It is very fluffy and pretty and can be any "flavor" you want it to be! I own most of the HOTP templates, they are versatile, easy to use and a great value. As long as you don't try to cut your design with the plastic template on it they will last forever.
I've had a difficult week as far as my health went so I have been busy making cards for Operation Write Home and I wanted to share a few I made. As I've said before, I don't know how I would handle things if I didn't have my crafting - it is a terrific stress reliever and nobody has to see my "oops" attempts!
Tomorrow I am helping out at my LSS for a fundraiser for a local horse rescue organization. I designed all the cards used at the fundraiser and the basis for all the cards were 4 different sets of Penny Black stickers (the left and right cards are from one set). I'm hoping to bring the cards home tomorrow and I will post them over the next few days. I am a little nervous about how they will be received tomorrow, but what's done is done. For a $10 donation a person gets a pre-cut kit (now that's a lot of work!) to make the four cards - everything is included right down to the pop dots!
Have a great weekend!
This week's challenge at PaperCutz Challenge our mission is to create a project using a die cut, hand stamped or digital stampede image of an ice cream cone, popsicle, ice cream sundae or milk shake. This challenge definitely says summer, doesn't it? I know that Mary has the challenge written as "Cricut cut", but any die cut machine or die-cut is welcome. However, if you haven't checked out Mary's Cricut challenges, you should! Also, have you stopped by Cardz TV with Mary? I just love her accent!
On to my project which doesn't fit into any of the categories (LOL), I used 2 templates from HOTP - 3-D Ice Cream Sundae and Sweet Treats Pockets.
I made an invitation and a party favor for an ice cream party (I LOVE ice cream). Both were pretty easy to do with the templates. You'll notice the small ice cream cone in the large one's pocket and this is where I will put the details for the party.
The ice cream sundae looks complicated, but goes together in a snap. The ice cream itself opens and you can put a small treat or gift inside. I used HOTP foil paper for the cup and their shine design paper for the topper and "wafer". This template even has a spoon! It is very fluffy and pretty and can be any "flavor" you want it to be! I own most of the HOTP templates, they are versatile, easy to use and a great value. As long as you don't try to cut your design with the plastic template on it they will last forever.
I've had a difficult week as far as my health went so I have been busy making cards for Operation Write Home and I wanted to share a few I made. As I've said before, I don't know how I would handle things if I didn't have my crafting - it is a terrific stress reliever and nobody has to see my "oops" attempts!
Tomorrow I am helping out at my LSS for a fundraiser for a local horse rescue organization. I designed all the cards used at the fundraiser and the basis for all the cards were 4 different sets of Penny Black stickers (the left and right cards are from one set). I'm hoping to bring the cards home tomorrow and I will post them over the next few days. I am a little nervous about how they will be received tomorrow, but what's done is done. For a $10 donation a person gets a pre-cut kit (now that's a lot of work!) to make the four cards - everything is included right down to the pop dots!
Have a great weekend!
Friday, July 1, 2011
PaperCutz Challenge Star Spangled Blog Hop!
Happy Friday and welcome to PaperCutz Challenges first ever blog hop! We are celebrating America's birthday with the challenge of a banner with lots of bling.
Don't forget about the blog candy on the PCC site. One lucky person will win a Cricut summer collection luau cartridge. So, be sure to stop at everyone's blog and get creative over this long weekend. The good thing about it though is when I was done inking I sprayed water on my craft sheet and soaked it all up with a coffee filter, so I have a very cool background for a card!
I heat embossed each of the letters using Judikins Diamond Sparkle EP (I love it!!) and then used Versamark on the edges of the stars and embossed those as well. I punched smaller stars from DCWV glitter matstack and used red, white and blue twine to hang my banner. I wish you could see the sparkle and shine, it is very pretty. I've already started hinting to my husband that I need a new, upgraded camera - but Christmas is a long way off (my b-day is also in December)!
I had to take the banner back in, because it looks like rain here in Maine, but it will be out again on my lower deck later this weekend when all the (adult) kids are here!
Every 4th of July brings back memories of the one Independence Day I was very far from home. In July, 1998 I was in Sarajevo, Bosnia as part of the peacekeeping force in the Former Republic of Yugoslavia. The American contingent treated all the multi-national troops to a cook-out of typical summer foods. Later that night there was a fireworks show over the camp. The interesting part was looking up in the hills and seeing tracer rounds be fired at the end of each burst! I'm sure it was there way of saying "Happy Birthday, America"!
Be sure to stop by everyone's blog and leave some love and good luck with the blog candy! In case you need it, here is the blog order:
Paper Cutz Challenge http://www.papercutzchallenge.blogspot.com/
Lisa http://www.mypurpleplayroom.blogspot.com
Penny http://www.pennydouph.blogspot.com/
DeNetra http://www.craftynanny3.blogspot.com/
Shelly http://www.cardsbyshelly.blogspot.com/
Kristie http://www.kreativekristie.blogspot.com/
Patti http://www.pattispaperfun.blogspot.com/
Diane http://www.happyscrapperdiane.blogspot.com/
Mary http://www.cardztv.blogspot.com/
Dee http://forum.paperwishes.com/album.php?albumid=31
Have a safe and wonderful 4th of July weekend! I'd love to hear from you!
If you got to my page from Lisa's you are headed in the right direction!
If not, the Challenge starts at the PCC blog.
Don't forget about the blog candy on the PCC site. One lucky person will win a Cricut summer collection luau cartridge. So, be sure to stop at everyone's blog and get creative over this long weekend. The good thing about it though is when I was done inking I sprayed water on my craft sheet and soaked it all up with a coffee filter, so I have a very cool background for a card!
I heat embossed each of the letters using Judikins Diamond Sparkle EP (I love it!!) and then used Versamark on the edges of the stars and embossed those as well. I punched smaller stars from DCWV glitter matstack and used red, white and blue twine to hang my banner. I wish you could see the sparkle and shine, it is very pretty. I've already started hinting to my husband that I need a new, upgraded camera - but Christmas is a long way off (my b-day is also in December)!
I had to take the banner back in, because it looks like rain here in Maine, but it will be out again on my lower deck later this weekend when all the (adult) kids are here!
Every 4th of July brings back memories of the one Independence Day I was very far from home. In July, 1998 I was in Sarajevo, Bosnia as part of the peacekeeping force in the Former Republic of Yugoslavia. The American contingent treated all the multi-national troops to a cook-out of typical summer foods. Later that night there was a fireworks show over the camp. The interesting part was looking up in the hills and seeing tracer rounds be fired at the end of each burst! I'm sure it was there way of saying "Happy Birthday, America"!
Paper Cutz Challenge http://www.papercutzchallenge.blogspot.com/
Lisa http://www.mypurpleplayroom.blogspot.com
Penny http://www.pennydouph.blogspot.com/
DeNetra http://www.craftynanny3.blogspot.com/
Shelly http://www.cardsbyshelly.blogspot.com/
Kristie http://www.kreativekristie.blogspot.com/
Patti http://www.pattispaperfun.blogspot.com/
Diane http://www.happyscrapperdiane.blogspot.com/
Mary http://www.cardztv.blogspot.com/
Dee http://forum.paperwishes.com/album.php?albumid=31
Have a safe and wonderful 4th of July weekend! I'd love to hear from you!
Happy Birthday America - the land of the free because of the brave!
Your next stop on the hop is the very talented Denatra.
Sunday, June 26, 2011
Mosaic Cards/OWH Second Million Challenge
I'm busily working on getting my cards packed up to mail off to Dixie, my shipper before the deadline of June 30. However, I keep coming up with "one more card" I want to make - does that happen to anyone else?
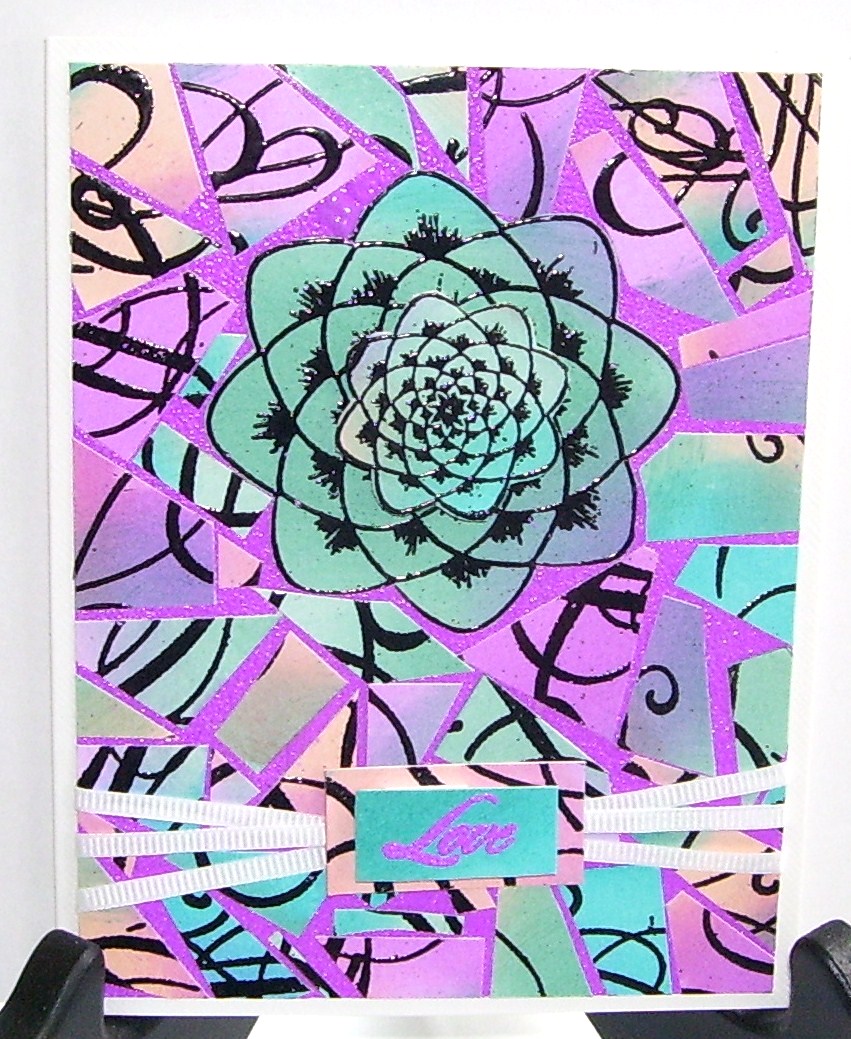
My good friend, Cheryl, owner of Inspired Designs, my LSS had a class on Thursday morning to make mosaic cards. I came in at the end, loved what I saw and decided to try it.
I first made a mother board for the background, I used Stampin Up glossy cardstock and Adirondack Earthtone Inks by Ranger. I sponged on 4 different colors trying to blend them together. I learned I tend to make my color splotches a little too large as you can see in the large Stream colored area. Still and all, didn't ruin the finished project.
I stamped my card focals in the corner of my paper and then used HOTP swirl stamps on the rest of the page using Versamark and black Zing embossing powder for all the images. I cut out the focals and then cut up the remainder of the paper any which way. I then tried the next step 2 ways: for one card I used a sheet of Humongo sticky paper and the other I used 1 1/2" Scor Tape. I found no difference in the finished product and by my figuring the Scor Tape is less expensive to use. I cut one of the focals into 3 pieces and reassembled on the sticky tape. I then added the cut up pieces to the rest of the sticky paper leaving space between pieces for the "grout". One thing is to be careful not to handle the stickiness if at all possible to make sure you get good adhesion. I sprinkled Neon Purple Zing Embossing Powder over the whole design and made sure (as much as possible) there was no powder on my mosaic pieces. Hit it with the heat gun and presto! - a beautiful card topper.
I left the flower whole on the second card and popped a smaller one on top for dimension. I finished off both cards with white grosgrain ribbon and a sentiment stamp (both HOTP). As I've mentioned before, my photography leaves much to be desired - the embossing and, really, the whole card is vibrantly colored.
Both are going in my OWH box which will, probably (LOL) get mailed on Monday.
Hope you are all enjoying your weekend and taking time to be creative!
My good friend, Cheryl, owner of Inspired Designs, my LSS had a class on Thursday morning to make mosaic cards. I came in at the end, loved what I saw and decided to try it.
I first made a mother board for the background, I used Stampin Up glossy cardstock and Adirondack Earthtone Inks by Ranger. I sponged on 4 different colors trying to blend them together. I learned I tend to make my color splotches a little too large as you can see in the large Stream colored area. Still and all, didn't ruin the finished project.
I stamped my card focals in the corner of my paper and then used HOTP swirl stamps on the rest of the page using Versamark and black Zing embossing powder for all the images. I cut out the focals and then cut up the remainder of the paper any which way. I then tried the next step 2 ways: for one card I used a sheet of Humongo sticky paper and the other I used 1 1/2" Scor Tape. I found no difference in the finished product and by my figuring the Scor Tape is less expensive to use. I cut one of the focals into 3 pieces and reassembled on the sticky tape. I then added the cut up pieces to the rest of the sticky paper leaving space between pieces for the "grout". One thing is to be careful not to handle the stickiness if at all possible to make sure you get good adhesion. I sprinkled Neon Purple Zing Embossing Powder over the whole design and made sure (as much as possible) there was no powder on my mosaic pieces. Hit it with the heat gun and presto! - a beautiful card topper.
I left the flower whole on the second card and popped a smaller one on top for dimension. I finished off both cards with white grosgrain ribbon and a sentiment stamp (both HOTP). As I've mentioned before, my photography leaves much to be desired - the embossing and, really, the whole card is vibrantly colored.
Both are going in my OWH box which will, probably (LOL) get mailed on Monday.
Hope you are all enjoying your weekend and taking time to be creative!
Friday, June 24, 2011
PaperCutz Challenge #97 and BLOG HOP alert!
Happy Friday everyone! It is raining again here in Maine and yesterday was a balmy 63 degrees. Definitely not our average summer. However, this week's PaperCutz Challenge should make things a little brighter. The challenge is to make a project using pink, orange, white and a little black. Interesting combination isn't it? I took some liberties with "a little black" to make this card:
My photography, as always, doesn't do justice to the vibrancy of the colors. The pink and orange in the focal are microbeads which I coated with glossy accents so they wouldn't rub off. It changed their look a bit, but since this card is destined for Operation Write Home, I figured it needed it. I love these papers from My Mind's Eye; part of the "Dusk" portion of the Meadow Lark by Carina Gardner. They are available here (don't let her blog throw you off - she is open for business and you can contact her through the blog).
I have a confession, I have a lot of difficulty cutting into paper I love - cause then it is gone and I can't look at it any more. I'm a clinical social worker, so I officially know this is a problem! LOL So, to save myself the angst the paper I actually used came from the cover piece to the paper pack. This is what I'm talking about:
As always, have a great week and please leave a comment, I love to read them and will come visit your blog as well.
My photography, as always, doesn't do justice to the vibrancy of the colors. The pink and orange in the focal are microbeads which I coated with glossy accents so they wouldn't rub off. It changed their look a bit, but since this card is destined for Operation Write Home, I figured it needed it. I love these papers from My Mind's Eye; part of the "Dusk" portion of the Meadow Lark by Carina Gardner. They are available here (don't let her blog throw you off - she is open for business and you can contact her through the blog).
I have a confession, I have a lot of difficulty cutting into paper I love - cause then it is gone and I can't look at it any more. I'm a clinical social worker, so I officially know this is a problem! LOL So, to save myself the angst the paper I actually used came from the cover piece to the paper pack. This is what I'm talking about:
Problem solved: beautiful card and intact paper - brilliant! You definitely need to look into this line, the tag sheet shown at top is just wonderful for scrapping or card making. I'm trying to look at all of my stash differently and use what I have, including packaging which sometimes is as beautiful as the product.
BLOG HOP ALERT!!!!
Next week, PaperCutz Challenge is having our first ever blog hop. We are very excited to be doing this and hoping everyone will stop by each of the design team's blogs and leave some love. The PCC site will be offering blog candy and I am looking to create a package of blog candy here - perhaps if I can make it to 50 followers during the hop.
As always, have a great week and please leave a comment, I love to read them and will come visit your blog as well.
Friday, June 17, 2011
Father's Day and PaperCutz Challenge 96
Happy Friday everyone! Last week I thought I'd be able to make a post each day showing masculine and/or Father's Day cards. However, real life was secretly laughing at me. So, I have several cards to show you today. These are cards I designed and taught at my local LSS. This was the first class that was all me so to speak and it was a lot of fun. I forgot one step in one card, but hey, its paper. First is the card for PaperCutz Challenge #96.
The challenge is a Father's Day card using a tag and any colors. I made this pocket card. It is a standard A2 card. The pocket stamp is from Heartfelt Creations, the 2 sentiments are HOTP and the dad comes from a $1 stamp from Michaels. I used textured white paper and denim Adirondack ink to make the jeans material. All embossing used pewter Zing embossing powder. I couldn't find any pewter brads so the rivets in the pocket are copper Stickles. Quick, easy and fun. The pocket can also hold a gift card. If you are a sewer, you could probably make this card out of a real pair of jeans!
These are easily made for any masculine card needs. You can just change the greeting inside.
The last group of cards were done using stencils for theorem painting. All 3 come from Jean Hansen Publications. Generally, these stencils are used with paint sticks, but I used Adirondack and Distress inks. The wolf and moose are pullout cards, using the tab to "open" the card for the greeting. This is very simple to do; using an A2 card place it with the fold on the bottom cut a second piece of cardstock slightly smaller, decorate both as desired and put the smaller panel inside the card (this piece must be inserted upside down or the greeting will be upside down) aligning with the bottom and right corners and use a brad to put them together. I made small pull tabs from circles to make it easier to open the card.
This is an interesting twist on a traditional card. The stencils are very easy to use and produce "wow" effects. After a little practice (not shown LOL), I can do one of these stencils in about 10 minutes using inks.
The bear was finished the same way. Only this card is a traditional 5x7. I used wood that is sold in sheets for papercrafting. I'm hooked on using this, it makes a wonderful look with various shading, but can also be altered.
That's it for this week. With 5 boys, a husband and 2 grandsons I need to have many different options for masculine cards. I hope these ideas help you as well.
Have a great weekend and Happy Father's Day!
Please, leave comments - I'd love to hear from you.
The challenge is a Father's Day card using a tag and any colors. I made this pocket card. It is a standard A2 card. The pocket stamp is from Heartfelt Creations, the 2 sentiments are HOTP and the dad comes from a $1 stamp from Michaels. I used textured white paper and denim Adirondack ink to make the jeans material. All embossing used pewter Zing embossing powder. I couldn't find any pewter brads so the rivets in the pocket are copper Stickles. Quick, easy and fun. The pocket can also hold a gift card. If you are a sewer, you could probably make this card out of a real pair of jeans!
The next card is a regular pyramid card with a masculine focal. I really enjoy using these LaPashe focals.They don't need to be cut out and they have many different varieties. They can be purchased here.
These are easily made for any masculine card needs. You can just change the greeting inside.
The last group of cards were done using stencils for theorem painting. All 3 come from Jean Hansen Publications. Generally, these stencils are used with paint sticks, but I used Adirondack and Distress inks. The wolf and moose are pullout cards, using the tab to "open" the card for the greeting. This is very simple to do; using an A2 card place it with the fold on the bottom cut a second piece of cardstock slightly smaller, decorate both as desired and put the smaller panel inside the card (this piece must be inserted upside down or the greeting will be upside down) aligning with the bottom and right corners and use a brad to put them together. I made small pull tabs from circles to make it easier to open the card.
This is an interesting twist on a traditional card. The stencils are very easy to use and produce "wow" effects. After a little practice (not shown LOL), I can do one of these stencils in about 10 minutes using inks.
The bear was finished the same way. Only this card is a traditional 5x7. I used wood that is sold in sheets for papercrafting. I'm hooked on using this, it makes a wonderful look with various shading, but can also be altered.
That's it for this week. With 5 boys, a husband and 2 grandsons I need to have many different options for masculine cards. I hope these ideas help you as well.
Have a great weekend and Happy Father's Day!
Please, leave comments - I'd love to hear from you.
Subscribe to:
Posts (Atom)